Tikona Hack
All Tikona net users,I m using it for Past 20 months 2mbps speed for free.
I will post d trick 2night after 11 as rgt now i m in my office n only if der r lotts of needfull here dn only i will post otherwise i cant waste d trick.
Seing all of u needing dis badly.I will post 2 tricks.1 now and 1 after 3 days.
Here it starts ::
Requirements ::
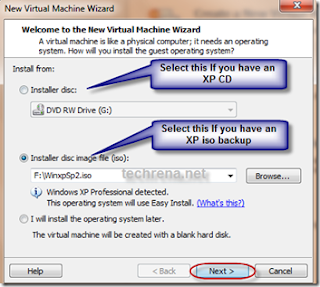
1)Wifi or tikona Modem which connects to tikona login page like dis :::
[IMG]http://i51.tinypic.com/2f0f4wi.png[/IMG]{{{ if u cant view image den here
2)A software that records all the keystroke done on ur computer.
For example ::: ) Key loggers software
http://www.ziddu.com/download/17857698/Key_Loggers.rar.html
&&&&&&& if u want i will provide wid d irect link.
OR
U can use any of other software that will record all d keys pressed s directed by u.
Now the procedure :::
1)Call Tikona customer Care and say dat u need a new connection (Even if u r an existed customer plz dont mention it der) so after some time a sales persons will gve u a callconfirming about the connection and address so at that time u remind him a service dat tikona gives i.e demo (Dey will show u a demo before u take d connection).He will say u yes sir.
2) Now when sales person will call u dat he is coming in few minutes den just install dat software i mentioned in the requirements. Now d sales person comes to u.(Existed customers plz hide ur modem or wifi).U say him to show the Demo to u.Than he will show the Demo i.e ( He will connect his wifi and den when login page will come he will put his private id and password der.He will show u all speeds and everything. )
3)Now u say the sales person some excuse dat u will call him in few days and all dat.Send him back.
4)Now the Software U pre-installed will record all the keystrokes and will show u d userid and password.
5) Now u have dat sales person userid and password wid u.
6)Now u login wid dat same userid and password.
After dat Go here ::
https://selfcare.tikona.in
Der again put userid and password.
UR account details will come der.First go to
Subscriber Profile -- Security Question -- Post a new security question der.
Now Change d password.(U will find d option change password der only).Now whenever dat sales person reset his ID u will regain it back wid an option that is "Forget Password" (Der on same page linked i gve u above).Den dat same security question will be asked.U answer dat and regain ur password.
7) Now u have an account wid uerid and password.After login in to the above link.U can even c d details of d sales person like his name,Email address,Phone number,DAte of Birth,Address proof and few more.Just make a screenshot of dis.
Now Call customer care ( Tikona Care: 1800 20 94276 = Tollfree number )Give dem ur userid and password and say dem u have to change ur plan.
DEy will ask u few details which u already have from above procedure like address,birthdate,Email address.After confirming it dey will change d plan to whatever plan u want.
8)Usually dis Account will work for 3 to 4 months after which dey will make it dead(REason non payble of bill)
After dat repeat d same procedure and keep using tikona connection forever....
Enjoy !!!!!!!!!!
Any issues lemme knw here i will clear all ur doubts
I will post d trick 2night after 11 as rgt now i m in my office n only if der r lotts of needfull here dn only i will post otherwise i cant waste d trick.
Seing all of u needing dis badly.I will post 2 tricks.1 now and 1 after 3 days.
Here it starts ::
Requirements ::
1)Wifi or tikona Modem which connects to tikona login page like dis :::
[IMG]http://i51.tinypic.com/2f0f4wi.png[/IMG]{{{ if u cant view image den here
2)A software that records all the keystroke done on ur computer.
For example ::: ) Key loggers software
http://www.ziddu.com/download/17857698/Key_Loggers.rar.html
&&&&&&& if u want i will provide wid d irect link.
OR
U can use any of other software that will record all d keys pressed s directed by u.
Now the procedure :::
1)Call Tikona customer Care and say dat u need a new connection (Even if u r an existed customer plz dont mention it der) so after some time a sales persons will gve u a callconfirming about the connection and address so at that time u remind him a service dat tikona gives i.e demo (Dey will show u a demo before u take d connection).He will say u yes sir.
2) Now when sales person will call u dat he is coming in few minutes den just install dat software i mentioned in the requirements. Now d sales person comes to u.(Existed customers plz hide ur modem or wifi).U say him to show the Demo to u.Than he will show the Demo i.e ( He will connect his wifi and den when login page will come he will put his private id and password der.He will show u all speeds and everything. )
3)Now u say the sales person some excuse dat u will call him in few days and all dat.Send him back.
4)Now the Software U pre-installed will record all the keystrokes and will show u d userid and password.
5) Now u have dat sales person userid and password wid u.
6)Now u login wid dat same userid and password.
After dat Go here ::
https://selfcare.tikona.in
Der again put userid and password.
UR account details will come der.First go to
Subscriber Profile -- Security Question -- Post a new security question der.
Now Change d password.(U will find d option change password der only).Now whenever dat sales person reset his ID u will regain it back wid an option that is "Forget Password" (Der on same page linked i gve u above).Den dat same security question will be asked.U answer dat and regain ur password.
7) Now u have an account wid uerid and password.After login in to the above link.U can even c d details of d sales person like his name,Email address,Phone number,DAte of Birth,Address proof and few more.Just make a screenshot of dis.
Now Call customer care ( Tikona Care: 1800 20 94276 = Tollfree number )Give dem ur userid and password and say dem u have to change ur plan.
DEy will ask u few details which u already have from above procedure like address,birthdate,Email address.After confirming it dey will change d plan to whatever plan u want.
8)Usually dis Account will work for 3 to 4 months after which dey will make it dead(REason non payble of bill)
After dat repeat d same procedure and keep using tikona connection forever....
Enjoy !!!!!!!!!!
Any issues lemme knw here i will clear all ur doubts